| |||||
|
The Gourd Report them down first. once the mold is wet, the spores are weighted, and the water holds most of them down. Everyone breathes a few spores on a daily basis, but it is the concentration you need to be concerned about, and wetting the gourds well can help reduce the risk to a minimum. If you have a gourd by itself, get a towel and soak it with water first, wrap it around the gourd, then bring it in to your sink of water or whereever you clean your gourds, and dip it well while cleaning the moldy areas off. Gourd Dust: Gourd dust from sanding, cutting, sawing, etc, on a gourd, can also cause serious lung and other problems. Gourd dust should not be breathed in, and certain precautions should be taken, good air circulation, air filtration systems, and definately a mask. I personally have suffered from painful lungs, labored breathing, having a hard time catching my breath, cough, and headache, just from working less than 1 hour cutting and sanding on gourds. So, please be careful, be cautious, protect yourself. You don’t need to be afraid of gourds, you just need to understand all the aspects, and safety will not be a problem. If you follow these simple precautions, you shouldn’t have a problem, and can enjoy your gourd hobby for many years to come.
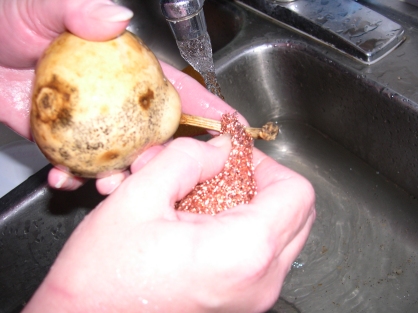
Cleaning a Dry GourdTHE OUTSIDE OF THE GOURD:The typical cleaning of a Gourd is pretty common knowledge among the Gourd world, however, there is always something that might help to make the job easier. For those who don’t know how to clean a gourd, it is pretty simple. There is a skin layer over the hard shell which requires some scrubbing or effort to remove it. The skin removes best if it has been soaked for a while in warm water, and a little liquid detergent will help. The easiest way is to fill your sink with water, and place the gourd into it, (providing your gourd is small enough to fit in the sink), and dip a towel into the water and lay it over the gourd, to keep the part of the gourd that remains above water, wet. You should let the gourd soak no less than 15 to 30 minutes, but it doesn’t hurt to let them soak for a couple of hours, should you forget they are there, and may even make the tough spots a little easier. Once the gourd has soaked thoroughly, using the backside of a knife, or a Chore boy or other copper type scrubber, scrub the skin off. Once you have scrubbed a few gourds, you will know how to tell when the skin has been removed and when it hasn’t. After scrubbing the skin off, you need to let the gourd dry before painting or burning on it, however it isn’t necessary to let it dry completely if you are going to cut it. For crafting, you may want to let it dry some, but not thoroughly, as the dampness will reduce the amount of dust created by cutting.
The Gourd Report
A HELPFUL METHOD: of cleaning the skin off is to wait for your gourds to get light, but not entirely dry. If the gourd still has some dampness to it, the skin removes much easier than when the skin has fully dried on. However, the mold will still be active and present on the gourd, so before handling the gourd, pick it up by wrapping it with a wet towel or rag, or spray it down to prevent mold spores from being spewed into the air around you. Once you have the gourd prepared for moving in one of these methods, submerge it entirely underwater, then you can begin scrubbing. CAUTION: Larger gourds may not fare well if you remove the skin before they are fully dry. This holds true not only for cleaning before it is completely dry, but for green cleaning, and boiling, which we will cover later in this booklet. We have had large kettles which only weighed a couple pounds, (dried from their original 11+ pounds when freshly picked),
The Gourd Report
but were not yet brownish in color, but rather were yellowish and turning. We scraped the skin off, presuming it had dried to a point that it would survive, instead, it sucked in and cracked, and has several spots that resemble knife stabs.
There are many different ways to clean the inside of a dry gourd, for over 10 years, we have used wire brush cups, and wire brush wheels attached to a 12 to 16 inch extension in a 3/8 inch drill. This will rapidly eat through all the white pulp that is attached to the inside of the shell. After wire brushing, a sanding or paint removal disk will smooth out the inside of the gourd rapidly, and make your gourd quickly usable. If the gourds are small enough, we boil them in water for 1 to 3 hours.
| ||
Gourds>Educational>The Gourd Report 1
|
Gourds TGR Associate Store Educational YouTube Videos Galleries Products Web Hosting Electronic Sales TGR Shopping Mall Shop by category
Website updated in whole or in part daily
© 2003 The Gourd Reserve ™
Daily Sales Online / Everything Makes Scents / The Joy of Hope Foundation / Music and the Arts / Carmellas Place / Danos Place / Family Friendly Forums / The Dunkin Academy
Web Design by Dan Dunkin


