So you've wanted to try your hand at woodburning, (also known as
pyrography), but the $10 pens at your favorite superstore are just
too hot for woodburning on Gourds. Your alternative is to spend
$75 - $300 on a professional temperature controlled woodburning
pen. Not anymore... Before I go on, let me make this little disclaimer...
this tutorial requires wiring up a switch and creating an electrically
safe temperature controller for your basic $10 woodburning pen.
Although we have made one of these, and it was using this that made
our determination that I wanted to do woodburning, then and only
then did we invest in excess of $200 on a good woodburning pen and
controller. We can only show you how we did this, the safety of
the device lies solely on the person who constructs one of these,
so we recommend if you don't know what you are doing, then please
seek a friend or professional that does. We are not responsible
if you get shocked trying this, but done properly there should be
no danger of shock.
First a list of what you need to buy:
Basic woodburner w/accessory tips
Short 12 gauge two prong extension cord (not the cheap appliance
extensions, get a good one 10 - 12 gauge, and the ground wire is not
necessary as your wood burner doesn't have one either.)
If you
don't buy a plastic electrical box, and choose to buy a metal one,
then you need a three prong cord and the ground wire must be fastened
securely to the box to ground it out.
Three 12Ga wire nuts
One plastic electrical box & cover
One light dimmer switch, (rated for 100W)
Total cost approx $20, (maybe less depending on where you buy and
sales available)
When purchasing your light dimmer switch, there are two basic types,
the type that have a push on/off function, or the type that either
slide to the off position or turn to the off position. Do not buy
the push on & off type, these type woodburner's take a few minutes
to heat up and cool down and there will be times you will wonder
if you actually turned it off or not, and other times it will get
bumped and turn off. You won't know if it is on or off until you
discover the burning is not consistent. If the switch must be turned
to be on or off, any question as to the status is a quick glance
away.
Step 1) The plastic electrical box has tear out holes at the top
and bottom, you need one opening at the top, and one opening at
the bottom. (some come already open with wire clamps, these are
OK too).
Step 2) Take your extension cord, and with a pair of wire cutters,
cut it in half. Think about where the box will be setting, and how
much room you need for the plug in for the wood burner, and allow
about an additional 8 inches of extension cord on each end. Strip
off about 4 inches of the insulation from the extension cord. Inside
you will see two wires, most likely they are either red and white,
or black and white. Strip about 3/4, (three quarters) of
an inch, from each of the four individual wires exposed after stripping
away the extension cord insulation, exposing the actual copper wire
inside.
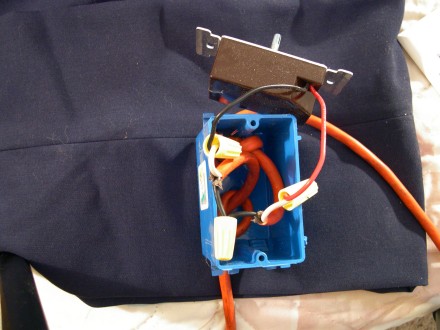
on steps 3-6 below, please refer to the image below showing
how our controller was assembled.
Step 3) Feed one cut end of the extension cord through the top
hole in the electrical box from the outside in, so the stripped
wires are inside the box, and the plug or socket end of the extension
cord is on the outside of the box. Feed the other cut end from the
other half of the extension cord through the bottom hole in the
electrical box in the same way, with the socket or plug on the outside
of the box. (see image below)